
How To Disable the Windows Firewall in Windows 10, 8, 7, Vista and XP
Windows Firewall is designed to help keep unauthorized users from accessing files and resources on your computer. A firewall is a must-have if you're concerned about your computer's safety.
Unfortunately, the Windows Firewall is far from perfect and can sometimes cause more harm than good, especially if there is another firewall program installed.
Don't disable the Windows Firewall unless you have a good reason but if you have another security program performing the same functions, feel free.
Follow the few steps below to disable the Windows Firewall in any version of Windows.
Disable the Firewall in Windows 10, 8, and 7
Open Control Panel.
You can do this a number of ways, but the easiest method is through the Power User Menu or the Start menu in Windows 7.
Select the System and Security link.
Note: The link I just named is only visible if you have the View by: option set to Category. If you're viewing the Control Panel applets in icon view, just skip down to the next step.
Choose Windows Firewall.
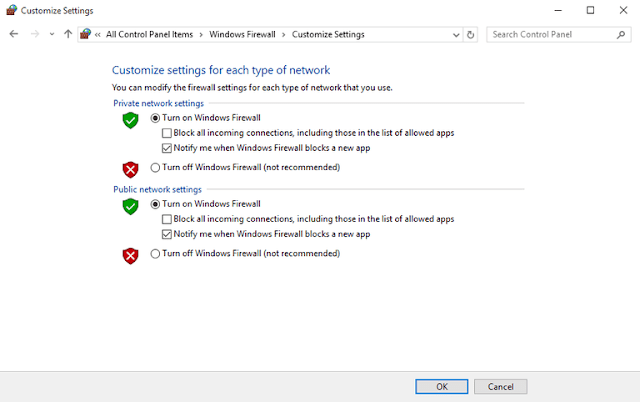
On the left side of the Windows Firewall screen, select Turn Windows Firewall on or off.
Select the bubble next to Turn off Windows Firewall (not recommended).
Note: You can disable the Windows Firewall for private networks only, just for public networks, or for both. To disable the Windows Firewall for both network types, you have to make sure to select Turn off Windows Firewall (not recommended) in both the private and the public section.
Click or tap the OK button to save the changes.
Now that the Windows Firewall is disabled, repeat whatever steps caused your problem to see if disabling this option has fixed your problem.
Disable the Firewall in Windows Vista
Open Control Panel with a click or tap on the Start menu and then the Control Panel link.
Choose Security from the category list.
Note: If you're in the Classic View of Control Panel, just skip down to the next step.
Click or tap on Windows Firewall.
Select the link on the left side of the window called Turn Windows Firewall on or off.
In the Windows Firewall Settings window, under the General tab, select the bubble next to the Off (not recommended) option.
Click or tap OK to apply the changes.
Disable the Firewall in Windows XP
Open Control Panel by clicking or tapping on Start and then Control Panel.
Click or tap on the Network and Internet Connections link.
Note: If you're viewing the Classic View of Control Panel, double-click or double-tap on the Network Connections icon and skip to Step 4.
Under the or pick a Control Panel icon section, click or tap on the Network Connections link.
In the Network Connections window, right-click or tap-and-hold on your network connection and choose Properties.
Note: If you have a "high speed" internet connection like Cable or DSL, or are on a network of some kind, your network connection will likely be titled Local Area Connection.
Choose the Advanced tab in the Properties window of your network connection.
In the Windows Firewall section under the Advanced tab, click or tap on the Settings... button.
Choose the Off (not recommended) radio button in the Windows Firewall window.
Click or tap OK in this window and click/tap OK again in the Properties window of your network connection.
You can now close the Network Connections window.


No comments